Introduction
In the world of IoT (Internet of Things), wireless temperature sensors play a crucial role in monitoring environmental conditions such as temperature and humidity. Whether you’re interested in home automation, smart agriculture, or simply experimenting with new technologies, creating your wireless sensor network can be an exciting and rewarding project. In this article, we’ll walk you through the process of building a wireless temperature and humidity sensor using the ESP32 microcontroller and the ESP-NOW communication protocol.
What is ESP-NOW?
ESP-NOW is a low-power, peer-to-peer wireless communication protocol developed by Espressif, the maker of the ESP32 microcontroller. Unlike Wi-Fi or Bluetooth, ESP-NOW allows devices to communicate directly with each other without the need for a router or access point. This makes it ideal for applications that require low latency and minimal power consumption, such as battery-powered sensors.
Step 1: Designing
Requirements
- The sensor should be wireless
- It should be battery-powered
- it should last up to 6 months on a single charge
Components Required
To get started, you’ll need the following components:
- ESP32 microcontroller: The heart of the project, known for its powerful processing capabilities and built-in wireless features. We are going to use ESP8685-WROOM-03 which is a module in the family of ESP32-C3 series chips.
- DHT11 or DHT22 sensor: A reliable sensor used to measure temperature and humidity.
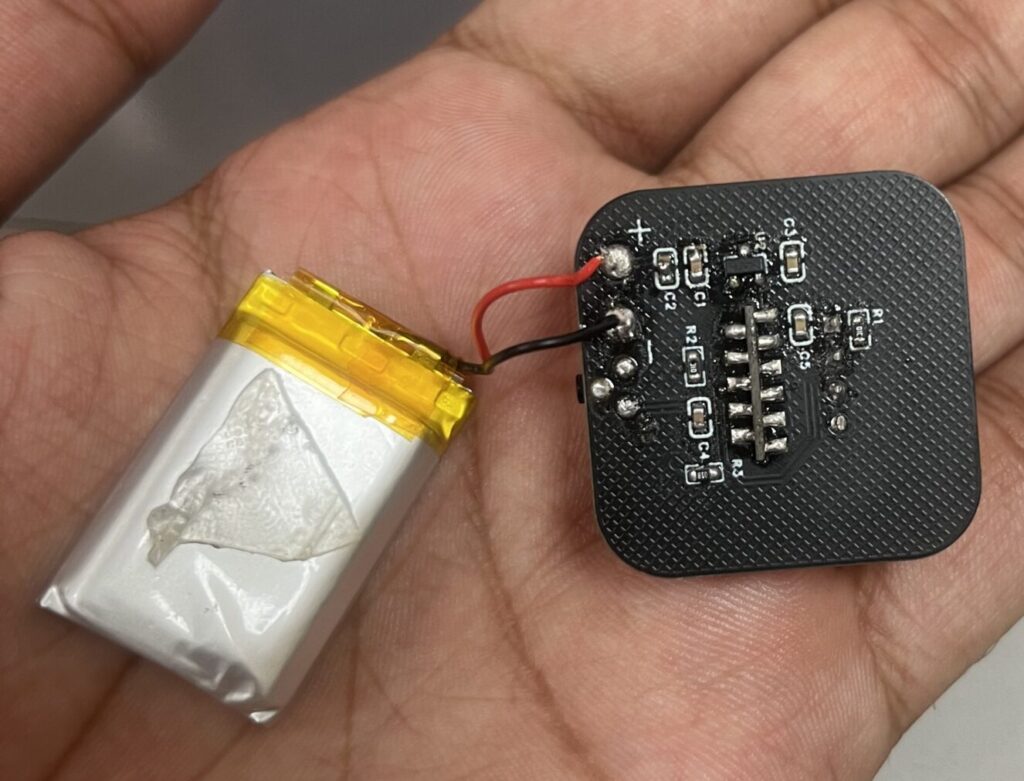
- Battery: We will be using a 3.7V 500mAh battery to power the system.
- MCP1700: A 3.3V voltage regulator with low dropout voltage.
AMS1117 3.3 vs MCP1700 3.3
The AMS1117 is a cheap and reliable voltage regulator IC. But it has a dropout voltage of 1V. because our battery gives a maximum of 4.2 volts at full charge, We cannot drive 3.3V out of AMS1117 IC with that voltage.
Hence we will be using MCP1700 which has a dropout voltage of 150mV only.
Step 2: Designing and Ordering PCBs
I designed the PCB in Altium Designer. The main requirements for designing the PCBs are
- Compact in design
- Battery Input pads
- LED light for indication
- A button
Once finished I uploaded my design onto Altium365 to share it with you all.
Get a free trial of Altium Designer with 365 and 25% off your purchase: https://www.altium365.com/yt/robocircuits
Now PCB design was ready. then it’s time to order the PCBs from NextPCB.
- Navigate to the NextPCB order page from the top menu and upload your PCB Gerber files on the order page. The website will parse the file and may extract parameters from the files and fill in these details for you such as PCB Size, Layer Count, Min. Trace/Space. Please confirm that these are correct.
- Select your board parameters. Some options such as quantity and color cannot be extracted from the Gerber files and require manual input. Please go through each option and choose your board parameters. Hover the mouse over the ‘?’ icon for additional information regarding each option.
- Select your Build Time and shipping options, then verify the cost of your order. When you are ready, click Add to Cart to save your order.
- Select your Build Time and shipping options, then verify the cost of your order. When you are ready, click Add to Cart to save your order.
- The website will then jump to your Shopping Cart. Tick the checkboxes of the orders you want to purchase together and click Check Out.
- Fill in your shipping address and choose a shipping method.
- Choose a payment method verify your order details and click Pay Now to omplete payment using your preferred method.
- Wait for your package to arrive. Please note that your files will undergo file review after payment and the engineers may have questions for you before they begin production.
Step 3: Assembly
PCBs were assembled in two phases
- SMD soldering using solder paste and heat gun.
- THT soldering using a soldering IRON.
Step 4: Writing the Code and Testing
With the hardware set up, it’s time to write the code. We’ll be using the Arduino IDE to program the ESP32. If you haven’t already, install the ESP32 board support in the Arduino IDE using this article.
We implemented deep sleep functionality in ESP8685 to save as much power as we could.
Let’s calculate the battery life with the new timings:
Step 1: Calculate the total current consumption for one cycle (active + sleep).
- Active mode:
- Current: 80mA
- Duration: 0.3 seconds
- Energy consumed: 80 mA x 0.3 seconds= 24 mA-seconds
- Deep sleep mode:
- Current (estimated): ~0.01mA (10µA)
- Duration: 60 seconds (1 minute)
- Energy consumed: 0.01 mA x 60 seconds = 0.6 mA-seconds
- Total energy consumption per cycle:
- 24 mA-seconds + 0.6 mA-seconds = 24.6 mA-seconds
Step 2: Calculate the number of cycles per hour.
- Each cycle duration: 0.3 seconds + 60 seconds = 60.3 seconds
- Number of cycles per hour: approx 59.7 cycles/hour
Step 3: Calculate the total energy consumption per hour.
- 59.7 cycles/hour x 24.6 mA-seconds/cycle = 1468.62 mA-seconds/hour
- Convert mA-seconds to mAh: 0.41mAh/hour
Step 4: Calculate the battery life.
- Battery capacity: 500mAh
- Battery life: 1219.5 hours
Conclusion:
The ESP32 will run for approximately 1219.5 hours on a 500mAh battery with the given power consumption pattern. This is roughly 50.8 days.
Humidity Sensor (ESP-NOW Master) Code
Here is the ESP32-C3 humidity sensor example.
// this code is written by RoboCircuits
// follow us on YouTube

#include <esp_now.h>
#include <WiFi.h>
#include <esp_wifi.h>  // only for esp_wifi_set_channel()
#include <Adafruit_Sensor.h>
#include <DHT.h>
#include <DHT_U.h>

#define uS_TO_S_FACTOR 1000000ULL /* Conversion factor for micro seconds to seconds */
#define TIME_TO_SLEEP 10           /* Time ESP32 will go to sleep (in seconds) */


#define DHTPIN 6

// Global copy of slave
esp_now_peer_info_t slave;
#define CHANNEL 1
#define PRINTSCANRESULTS 0
#define DELETEBEFOREPAIR 0

#define DHTTYPE DHT11  // DHT 11

DHT_Unified dht(DHTPIN, DHTTYPE);


// Init ESP Now with fallback
void InitESPNow() {
  WiFi.disconnect();
  if (esp_now_init() == ESP_OK) {
    Serial.println("ESPNow Init Success");
  } else {
    Serial.println("ESPNow Init Failed");
    // Retry InitESPNow, add a counte and then restart?
    // InitESPNow();
    // or Simply Restart
    ESP.restart();
  }
}

// Scan for slaves in AP mode
void ScanForSlave() {
  int16_t scanResults = WiFi.scanNetworks(false, false, false, 300, CHANNEL);  // Scan only on one channel
  // reset on each scan
  bool slaveFound = 0;
  memset(&slave, 0, sizeof(slave));

  Serial.println("");
  if (scanResults == 0) {
    Serial.println("No WiFi devices in AP Mode found");
  } else {
    Serial.print("Found ");
    Serial.print(scanResults);
    Serial.println(" devices ");
    for (int i = 0; i < scanResults; ++i) {
      // Print SSID and RSSI for each device found
      String SSID = WiFi.SSID(i);
      int32_t RSSI = WiFi.RSSI(i);
      String BSSIDstr = WiFi.BSSIDstr(i);

      if (PRINTSCANRESULTS) {
        Serial.print(i + 1);
        Serial.print(": ");
        Serial.print(SSID);
        Serial.print(" (");
        Serial.print(RSSI);
        Serial.print(")");
        Serial.println("");
      }
      delay(10);
      // Check if the current device starts with `Slave`
      if (SSID.indexOf("Slave") == 0) {
        // SSID of interest
        Serial.println("Found a Slave.");
        Serial.print(i + 1);
        Serial.print(": ");
        Serial.print(SSID);
        Serial.print(" [");
        Serial.print(BSSIDstr);
        Serial.print("]");
        Serial.print(" (");
        Serial.print(RSSI);
        Serial.print(")");
        Serial.println("");
        // Get BSSID => Mac Address of the Slave
        int mac[6];
        if (6 == sscanf(BSSIDstr.c_str(), "%x:%x:%x:%x:%x:%x", &mac[0], &mac[1], &mac[2], &mac[3], &mac[4], &mac[5])) {
          for (int ii = 0; ii < 6; ++ii) {
            slave.peer_addr[ii] = (uint8_t)mac[ii];
          }
        }

        slave.channel = CHANNEL;  // pick a channel
        slave.encrypt = 0;        // no encryption

        slaveFound = 1;
        // we are planning to have only one slave in this example;
        // Hence, break after we find one, to be a bit efficient
        break;
      }
    }
  }

  if (slaveFound) {
    Serial.println("Slave Found, processing..");
  } else {
    Serial.println("Slave Not Found, trying again.");
  }

  // clean up ram
  WiFi.scanDelete();
}

// Check if the slave is already paired with the master.
// If not, pair the slave with master
bool manageSlave() {
  if (slave.channel == CHANNEL) {
    if (DELETEBEFOREPAIR) {
      deletePeer();
    }

    Serial.print("Slave Status: ");
    // check if the peer exists
    bool exists = esp_now_is_peer_exist(slave.peer_addr);
    if (exists) {
      // Slave already paired.
      Serial.println("Already Paired");
      return true;
    } else {
      // Slave not paired, attempt pair
      esp_err_t addStatus = esp_now_add_peer(&slave);
      if (addStatus == ESP_OK) {
        // Pair success
        Serial.println("Pair success");
        return true;
      } else if (addStatus == ESP_ERR_ESPNOW_NOT_INIT) {
        // How did we get so far!!
        Serial.println("ESPNOW Not Init");
        return false;
      } else if (addStatus == ESP_ERR_ESPNOW_ARG) {
        Serial.println("Invalid Argument");
        return false;
      } else if (addStatus == ESP_ERR_ESPNOW_FULL) {
        Serial.println("Peer list full");
        return false;
      } else if (addStatus == ESP_ERR_ESPNOW_NO_MEM) {
        Serial.println("Out of memory");
        return false;
      } else if (addStatus == ESP_ERR_ESPNOW_EXIST) {
        Serial.println("Peer Exists");
        return true;
      } else {
        Serial.println("Not sure what happened");
        return false;
      }
    }
  } else {
    // No slave found to process
    Serial.println("No Slave found to process");
    return false;
  }
}

void deletePeer() {
  esp_err_t delStatus = esp_now_del_peer(slave.peer_addr);
  Serial.print("Slave Delete Status: ");
  if (delStatus == ESP_OK) {
    // Delete success
    Serial.println("Success");
  } else if (delStatus == ESP_ERR_ESPNOW_NOT_INIT) {
    // How did we get so far!!
    Serial.println("ESPNOW Not Init");
  } else if (delStatus == ESP_ERR_ESPNOW_ARG) {
    Serial.println("Invalid Argument");
  } else if (delStatus == ESP_ERR_ESPNOW_NOT_FOUND) {
    Serial.println("Peer not found.");
  } else {
    Serial.println("Not sure what happened");
  }
}

uint8_t data = 255;
// send data
void sendData() {

  pinMode(5, OUTPUT);
  digitalWrite(5, HIGH);

  sensors_event_t event;
  while (data == 255) {
    dht.temperature().getEvent(&event);
    if (isnan(event.temperature)) {
      Serial.println(F("Error reading temperature!"));
    } else {
      Serial.print(F("Temperature: "));
      Serial.print(event.temperature);
      Serial.println(F("°C"));
    }
    data = (uint8_t)(event.temperature);
    delay(100);
  }
  // Get humidity event and print its value.
  dht.humidity().getEvent(&event);
  if (isnan(event.relative_humidity)) {
    Serial.println(F("Error reading humidity!"));
  } else {
    Serial.print(F("Humidity: "));
    Serial.print(event.relative_humidity);
    Serial.println(F("%"));
  }

  // Serial.print(data);
  const uint8_t *peer_addr = slave.peer_addr;

  Serial.print("Sending: ");
  Serial.println(data);
  esp_err_t result = esp_now_send(peer_addr, &data, sizeof(data));
  Serial.print("Send Status: ");
  if (result == ESP_OK) {
    Serial.println("Success");
  } else if (result == ESP_ERR_ESPNOW_NOT_INIT) {
    // How did we get so far!!
    Serial.println("ESPNOW not Init.");
  } else if (result == ESP_ERR_ESPNOW_ARG) {
    Serial.println("Invalid Argument");
  } else if (result == ESP_ERR_ESPNOW_INTERNAL) {
    Serial.println("Internal Error");
  } else if (result == ESP_ERR_ESPNOW_NO_MEM) {
    Serial.println("ESP_ERR_ESPNOW_NO_MEM");
  } else if (result == ESP_ERR_ESPNOW_NOT_FOUND) {
    Serial.println("Peer not found.");
  } else {
    Serial.println("Not sure what happened");
  }
}

// callback when data is sent from Master to Slave
void OnDataSent(const uint8_t *mac_addr, esp_now_send_status_t status) {
  char macStr[18];
  snprintf(macStr, sizeof(macStr), "%02x:%02x:%02x:%02x:%02x:%02x",
           mac_addr[0], mac_addr[1], mac_addr[2], mac_addr[3], mac_addr[4], mac_addr[5]);
  Serial.print("Last Packet Sent to: ");
  Serial.println(macStr);
  Serial.print("Last Packet Send Status: ");
  Serial.println(status == ESP_NOW_SEND_SUCCESS ? "Delivery Success" : "Delivery Fail");
}

void setup() {
  Serial.begin(115200);
  dht.begin();

  pinMode(7,OUTPUT);
  digitalWrite(7,HIGH);

  //Set device in STA mode to begin with
  WiFi.mode(WIFI_STA);
  esp_wifi_set_channel(CHANNEL, WIFI_SECOND_CHAN_NONE);
  Serial.println("ESPNow/Basic/Master Example");
  // This is the mac address of the Master in Station Mode
  Serial.print("STA MAC: ");
  Serial.println(WiFi.macAddress());
  Serial.print("STA CHANNEL ");
  Serial.println(WiFi.channel());
  // Init ESPNow with a fallback logic
  InitESPNow();
  // Once ESPNow is successfully Init, we will register for Send CB to
  // get the status of Trasnmitted packet
  esp_now_register_send_cb(OnDataSent);

  sensor_t sensor;
  dht.temperature().getSensor(&sensor);
  Serial.println(F("------------------------------------"));
  Serial.println(F("Temperature Sensor"));
  Serial.print(F("Sensor Type: "));
  Serial.println(sensor.name);
  Serial.print(F("Driver Ver:  "));
  Serial.println(sensor.version);
  Serial.print(F("Unique ID:   "));
  Serial.println(sensor.sensor_id);
  Serial.print(F("Max Value:   "));
  Serial.print(sensor.max_value);
  Serial.println(F("°C"));
  Serial.print(F("Min Value:   "));
  Serial.print(sensor.min_value);
  Serial.println(F("°C"));
  Serial.print(F("Resolution:  "));
  Serial.print(sensor.resolution);
  Serial.println(F("°C"));
  Serial.println(F("------------------------------------"));
  // Print humidity sensor details.
  dht.humidity().getSensor(&sensor);
  Serial.println(F("Humidity Sensor"));
  Serial.print(F("Sensor Type: "));
  Serial.println(sensor.name);
  Serial.print(F("Driver Ver:  "));
  Serial.println(sensor.version);
  Serial.print(F("Unique ID:   "));
  Serial.println(sensor.sensor_id);
  Serial.print(F("Max Value:   "));
  Serial.print(sensor.max_value);
  Serial.println(F("%"));
  Serial.print(F("Min Value:   "));
  Serial.print(sensor.min_value);
  Serial.println(F("%"));
  Serial.print(F("Resolution:  "));
  Serial.print(sensor.resolution);
  Serial.println(F("%"));
  Serial.println(F("------------------------------------"));

  esp_sleep_enable_timer_wakeup(TIME_TO_SLEEP * uS_TO_S_FACTOR);
  Serial.println("Setup ESP32 to sleep for every " + String(TIME_TO_SLEEP) + " Seconds");
}

void loop() {
  // In the loop we scan for slave
  ScanForSlave();
  // If Slave is found, it would be populate in `slave` variable
  // We will check if `slave` is defined and then we proceed further
  if (slave.channel == CHANNEL) {  // check if slave channel is defined
    // `slave` is defined
    // Add slave as peer if it has not been added already
    bool isPaired = manageSlave();
    if (isPaired) {
      // pair success or already paired
      // Send data to device
      sendData();
    } else {
      // slave pair failed
      Serial.println("Slave pair failed!");
    }
  } else {
    // No slave found to process
  }

  // wait for 3seconds to run the logic again

  digitalWrite(7,LOW);

  Serial.println("Going to sleep now");
  Serial.flush();
  esp_deep_sleep_start();
}
ESP-NOW Slave Code
Slave Code for Heltec ESP32 LoRa V2. To program a ESP32 LoRa V2 from Heltec you may need to read this article.
/**
   ESPNOW - Basic communication - Slave
   Date: 26th September 2017
   Author: Arvind Ravulavaru <https://github.com/arvindr21>
   Purpose: ESPNow Communication between a Master ESP32 and a Slave ESP32
   Description: This sketch consists of the code for the Slave module.
   Resources: (A bit outdated)
   a. https://espressif.com/sites/default/files/documentation/esp-now_user_guide_en.pdf
   b. http://www.esploradores.com/practica-6-conexion-esp-now/

   << This Device Slave >>

   Flow: Master
   Step 1 : ESPNow Init on Master and set it in STA mode
   Step 2 : Start scanning for Slave ESP32 (we have added a prefix of `slave` to the SSID of slave for an easy setup)
   Step 3 : Once found, add Slave as peer
   Step 4 : Register for send callback
   Step 5 : Start Transmitting data from Master to Slave

   Flow: Slave
   Step 1 : ESPNow Init on Slave
   Step 2 : Update the SSID of Slave with a prefix of `slave`
   Step 3 : Set Slave in AP mode
   Step 4 : Register for receive callback and wait for data
   Step 5 : Once data arrives, print it in the serial monitor

   Note: Master and Slave have been defined to easily understand the setup.
         Based on the ESPNOW API, there is no concept of Master and Slave.
         Any devices can act as master or salve.
*/
#include <Wire.h>         // Only needed for Arduino 1.6.5 and earlier
#include "SSD1306Wire.h"  // legacy: #include "SSD1306.h"
// OR #include "SH1106Wire.h"   // legacy: #include "SH1106.h"

#include "pins_arduino.h"

#include <esp_now.h>
#include <WiFi.h>

#define CHANNEL 1

SSD1306Wire display(0x3c, SDA_OLED, SCL_OLED);  // ADDRESS, SDA, SCL  -  SDA_OLED and SCL_OLED are the pins from pins_arduino.h where the Heltec connects the OLED display

#define DEMO_DURATION 3000
typedef void (*Demo)(void);

int demoMode = 0;
int counter = 1;

void VextON(void) {
  pinMode(Vext, OUTPUT);
  digitalWrite(Vext, LOW);
}

// Init ESP Now with fallback
void InitESPNow() {
  WiFi.disconnect();
  if (esp_now_init() == ESP_OK) {
    Serial.println("ESPNow Init Success");
  } else {
    Serial.println("ESPNow Init Failed");
    // Retry InitESPNow, add a counte and then restart?
    // InitESPNow();
    // or Simply Restart
    ESP.restart();
  }
}

// config AP SSID
void configDeviceAP() {
  const char *SSID = "Slave_1";
  bool result = WiFi.softAP(SSID, "Slave_1_Password", CHANNEL, 0);
  if (!result) {
    Serial.println("AP Config failed.");
  } else {
    Serial.println("AP Config Success. Broadcasting with AP: " + String(SSID));
    Serial.print("AP CHANNEL ");
    Serial.println(WiFi.channel());
  }
}

void displayReset(void) {
  // Send a reset
  pinMode(RST_OLED, OUTPUT);
  digitalWrite(RST_OLED, HIGH);
  delay(1);
  digitalWrite(RST_OLED, LOW);
  delay(1);
  digitalWrite(RST_OLED, HIGH);
  delay(1);
}

void OnDataRecv(const esp_now_recv_info_t * info, const uint8_t *data, int data_len) {
  char macStr[18];
  snprintf(macStr, sizeof(macStr), "%02x:%02x:%02x:%02x:%02x:%02x",
           info->src_addr[0], info->src_addr[1], info->src_addr[2], info->src_addr[3], info->src_addr[4], info->src_addr[5]);
  Serial.print("Last Packet Recv from: "); Serial.println(macStr);
  Serial.print("Last Packet Recv Data: ");
  Serial.println(*data);
  Serial.println("");

  char message[20];
  sprintf(message, "Temperature = %d", *data);
  display.setFont(ArialMT_Plain_16);
  display.setTextAlignment(TEXT_ALIGN_LEFT);
  display.drawStringMaxWidth(0, 0, 128, message);

  display.setFont(ArialMT_Plain_10);
  display.setTextAlignment(TEXT_ALIGN_RIGHT);
  // display.drawString(128, 54, String(millis()));
  // write the buffer to the display
  display.display();
  display.clear();
}

void setup() {
  Serial.begin(115200);
  Serial.println("ESPNow/Basic/Slave Example");

  // This turns on and resets the OLED on the Heltec boards
  VextON();
  displayReset();

  // Initialising the UI will init the display too.
  display.init();

  display.flipScreenVertically();
  display.setFont(ArialMT_Plain_10);

  //Set device in AP mode to begin with
  WiFi.mode(WIFI_AP);
  // configure device AP mode
  configDeviceAP();
  // This is the mac address of the Slave in AP Mode
  Serial.print("AP MAC: ");
  Serial.println(WiFi.softAPmacAddress());
  // Init ESPNow with a fallback logic
  InitESPNow();
  // Once ESPNow is successfully Init, we will register for recv CB to
  // get recv packer info.
  esp_now_register_recv_cb(OnDataRecv);
}

// callback when data is recv from Master


void loop() {
  // Chill
}
On testing the sensor was working perfectly. It was transmitting values over the ESP-NOW protocol to the slave device successfully.